Friday, November 22, 2013

[UDK Quick Tip] Alpha Channel sRGB

Just a quick reminder that alpha channels of a textures won't be stored in sRGB color space. Having linear data is crucial for height or normal maps, however when using the alpha channel for something like a specular map it will just look wrong.

A quick way to fix this is to do a linear -> sRGB conversion inside the material, by taking the power of 2.2. The downside of this method is an extra 5 instructions. Instead it's good practice to multiply the alpha channel by itself (=taking the power of 2) which is slightly wrong but only adding a single instruction.


Sunday, November 3, 2013

[Blender/UDK] Fire Hydrant Model

Lately I've been practicing some Sub-D modeling. The Polycount thread on that topic was a great resource for recreating various shapes to begin with. Afterwards I started to make whole models; this fire hydrant was the first one. The topology/edgeflow is a bit messy where the main cylinder gets extruded and causes some pinching. But it was sufficient to bake a proper normal map for the low poly. The model is also slightly out of proportions since it's too elongated, espacially at the top.


High Poly / Wireframe in Blender
http://www.abload.de/img/firehydrant_001hp4jf05.png


Textured low poly in Blender (GLSL viewport grab)
http://www.abload.de/img/firehydrant_002tpr71.png


Textured low poly + LoD model in UDK
http://www.abload.de/img/firehydrant_003cypu6.png


Blendswap Download: http://www.blendswap.com/blends/view/70874
Sketchfab Preview: https://sketchfab.com/show/96ded07b6ac1434b9225531540fe2bda

Sunday, October 13, 2013

[WIP] Parallax Corrected Cubmaps in UDK/UE3

A first approach on using parallax corrected Cubemaps in UDK/UE3, more to follow.


Cubemap with default reflection vector

 
Parallax corrected Cubemap


Reference


Material Setup

Thursday, September 5, 2013

[UDK/UE3 Material] Normals From Height

This post is about generating normals from height maps on runtime in the material editor.
UDK comes with a material function that can do this job but it's rather poor: the result is pretty noisy, might suffer from small artifacts and shifts the texture by half a texel. The main reason for this is that it only offsets the height texture in one direction on both, x and y axis by a certain amount - then calculates normals from change in height.


Material

For a better result you should offset the height texture in both directions on both axes. It's also recommended to do these offsets in texel increments.


Of course there are more advanced algorithms available to generate normals but these are expensive and therefore not advisable for real-time usage. As an example, this is the code from ATI's NormalMapGenerator/Rendermonkey implemented in a custom node (8 samples, Sobel kernel):


Comparison

UDK Material Function (55 instructions)


Recommended Material (55 instructions)
ATI/Rendermonkey/Sobel (70 instructions)


For further comparison, here's the equivalent external normalmap

TC_Normalmap (48 instructions)

  TC_NormalmapUncompressed (51 instructions)

Monday, September 2, 2013

[UDK] Iterative Parallax Mapping

Iterative Parallax Mapping is a good way to improve the simple, old fashioned Parallax/BumpOffset Mapping which often suffers from texture swimming and only barely noticable effects. Yet it's way cheaper than complex techniques like parallax occlusion mapping or relief mapping.


Material

To get started with the material editor I'd suggest to rebuild the functionality of the BumpOffset node first.


With iterative parallax mapping the texcoords of this simple parallax effect are used as an input for another parallax pass. In addition the height value is being multiplied by the normal maps blue channel which prevents from texture swimming at steep slopes. Having multiple iterations also means that the total height ratio is equal to [height ratio per pass * iteration count].
This is the material setup for 2 iterations:


As an alternative you can chain up multiple BumpOffset nodes. This won't include a multiply by normal.z but is faster to set up as well as cheaper on instructions.


For a more flexible setup (varying iteration counts) you can put all of this into a custom node:


Results

Iterative parallax mapping can produce some visually pleasing results. Of course it's not as good POM as it won't handle self occlusion. But even though it's just a shift of texture coordinates, some of the fakery depth can be preserved even at an oblique angle of view. For textures like bricks or cobble stone it might be also a good idea to implement some fakery self shadowing for the material.


Performance

The performance impact of the material is 5 shader instructions per additional iteration (or 3 instructions per iteration if you stick with multiple BumpOffset nodes). For most materials there is no need to go higher than 4 iterations.


Normal Mapping Normal + Parallax Normal + Iterative Plx
(1 Iteration)
Normal + Iterative Plx
(2 Iterations)
Normal + Iterative Plx
(3 Iterations)
Normal + Iterative Plx
(4 Iterations)
Normal + Iterative Plx
(8 Iterations)
Instructions 48 51 54 59 64 69 89

Monday, August 5, 2013

[UDK Quick Tip] Foliage Tool Lightmaps


Whenever using UDKs foliage tool with static lighting take into consideration that all lightmaps of a single foliage cluster are batched into a single lightmap texture.
This is the reason why you should always keep the amount of instances per cluster at a power of 2 value. The default cluster size is 100 which is a waste of 21.875% of lightmap memory compared to a size of 128. To take it one step further try to make the total amount of instances equal to the product of cluster count multiplied by instances per cluster, or at least slightly less. Also increase the cluster radius so that it does no affect the cluster count at all.


I did a quick comparison with a simple landscape and some foliage (~3200 grass meshes, ~320 trees).
The cluster size for the non-optimized run was 50/10 and 64/16 for the optimized one. The foliage lightmaps have been rather small (grass 16²px, trees 128²px).


Map size Lightmap Memory Shadowmap Memory Lightmap Count
non-optimized 163 MB 38.2 MB 32.3 MB 358
optimized 152 MB 29.5 MB 23.9 MB 329


Another reason for optimizing the lightmap usage for foliage is artifacts you might get with meshes which have multiple materials, e.g. trees (bark + leaves)

Monday, July 8, 2013

Blender - xNormal Workflow

Some days ago I stumbled upon a nifty xNormal Blender addon from the user ohsnapitsjoel over at BA forums.
The addon is a big time saver since it lets you access all the relevant xNormal baking options directly from Blender.

Blenderartists Thread: http://blenderartists.org/forum/showthread.php?291665-AddOn-xNormal-3-18-1-import-export-Updated-7-6-13
 Bitbucket Link: https://bitbucket.org/ohsnapitsjoel/io_xnormal/src


With the latest update there was also added an option to specify a mesh from your .blend file as a cage for baking.


Wednesday, July 3, 2013

[Blender/UDK] Tileable Textures from HP models

Lately, I've made several textures based on high poly models. Basic geometry and large/mid-scale details have been sculpted in Blender in order to bake normal, height and ambient occlusion maps - cavity maps have been generated in xnormal.
In Photoshop I did paint the basic colors and used a desaturated photograph overlay for the fine details.


Sunday, June 30, 2013

[Blender] Modeling A Football In One Minute

This is a quick tutorial about modeling a football (aka soccer ball) in blender. It'll take roughly 1 minute to finish the model. Low poly, baking maps, setting up a simple material might take another 2 minutes.


First of all add an Icosphere object with 1 subdivision, set the size to whatever you like (mine's 12).


Go into edit mode and use bevel (CTRL+B). Make sure to check "vertex only" and set the offset to a value of your choice.
Assign 2 different maerials to the pentagon (black)  and hexagon (white) shapes.


Afterwards use another bevel command on the whole object. Set the offset to a very low value now, this is only needed to keep the penta/hex shapes when adding subdivisions later on.
Switch to Face select mode and invert the selection (CTRL+I). Use extrude individual with a high offset value, this should be ~4-8 times larger like you want the final result to look like.


Change the pivot point from median point to individual origins and scale up the penta/hex polys slightly to minimize the space in between. Afterwards extrude again but only scale down the faces, don't apply an offset.


Go to object mode and add a subdivision surface modifier with at least 2-3 subdivision.
For the final step add a Cast modifier. Keep the cast type (Sphere), and increase the factor to something like 0.75-0.85.
Higher extrude offset values from the step before allows to set the factor to a higher level and therefore turns the simple icosphere more into a perfect sphere shape.


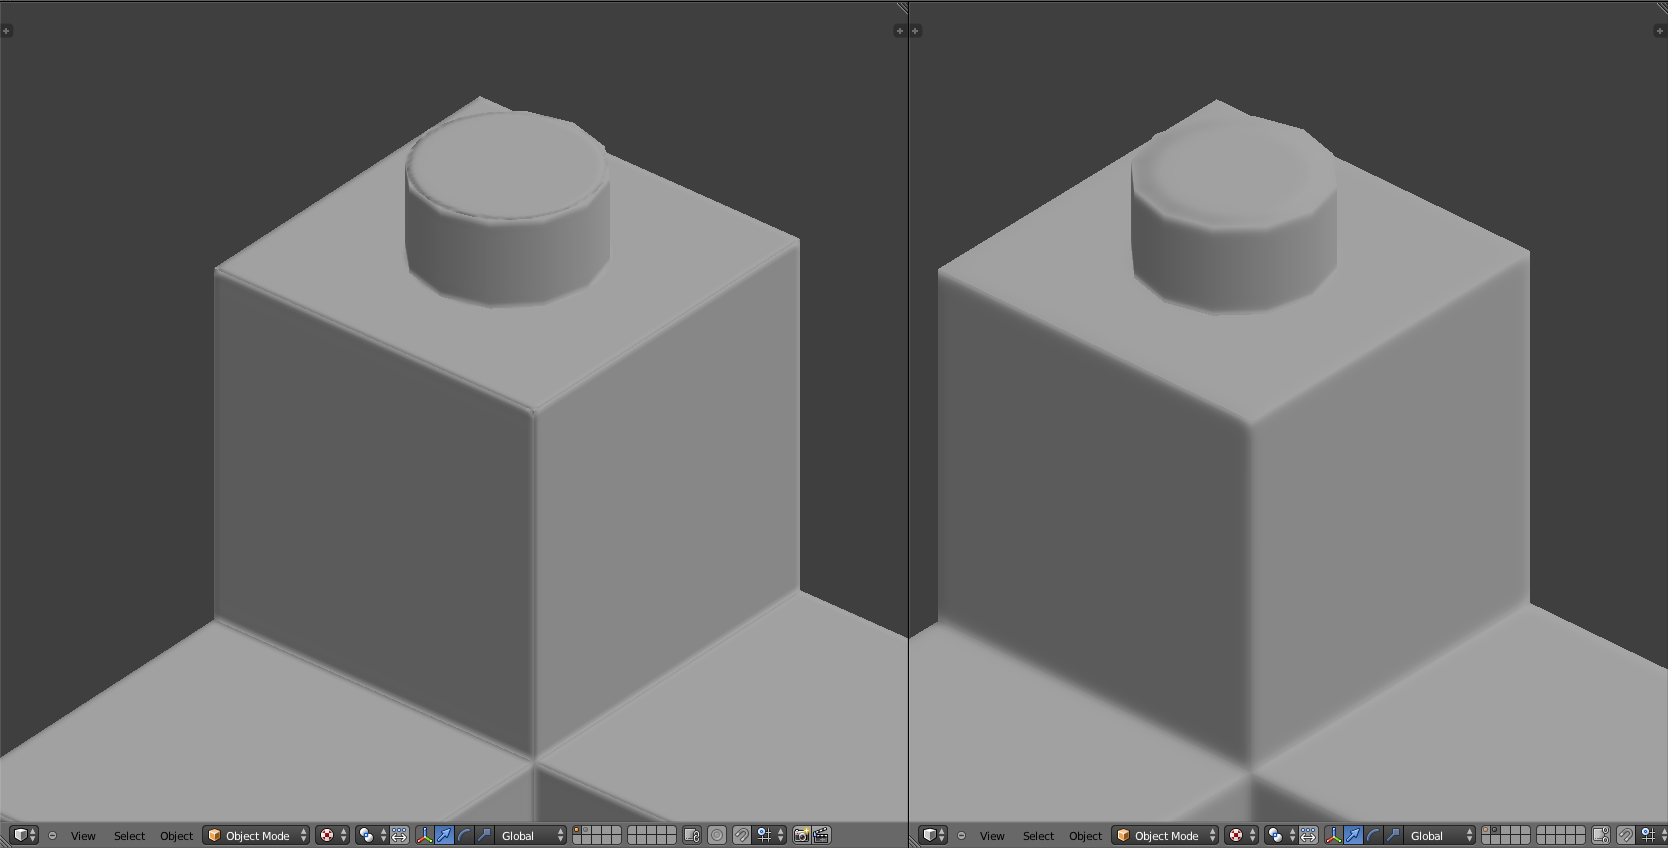
For the low poly model redo the first step. Add an icosphere of the same size and use a bevel command with the same settings.
A simple tennis ball unwrap works quite well here and should give you 2 'rectangular' UV islands.


Switch to edit object mode and apply a subdivision surface modifier with just one simple (not catmull clark) subdivision. Afterwards add and apply a Cast modifier (sphere type).


Scale up the low poly model until it matches the high poly. Bake normal and texture maps.